
Insert variables in Excel from the Onvio Office add-in
 Show expandable text
 Hide expandable text
You can insert amount variables, text variables, and create formulas based on information that is linked to from Onvio Trial Balance. By using the integrated features within the Onvio Office add-in ribbon, you can simplify your reporting needs in Microsoft Excel.
Amount Variables
Use the Amount Variables tab to define variables for specified amount types, accounts, types of accounts, and other values, and insert them into the selected cells of the Microsoft Excel worksheet.
- Click the Amount Variables tab in the Insert Variables panel.
- Select one of the following Amount Types to insert into the worksheet.
Note: Selections vary in the Amount Variables tab based on the selected Amount Type.
- GL Account data
- Account Number
- Account Description
- Amounts (Balance, Debit amount, Credit amount)
- Grouping Schedule data (for example, Account Classification)
- Code/Subcode
- Code/Subcode Description
- Total Amounts (Balance, Debit, and Credit, based on account grouping)
- Tax Grouping Schedule data
- Tax Code/Subcode
- Tax Code/Subcode Descriptions
- Total Amounts (Balance, Debit, Credit, based on account grouping)
- Net Income amounts
- GL Account data
- Click the Insert button to insert the variable into the selected cells of the worksheet.
Text variables
Use the Text Variables tab to define and insert text variables based on the current binder records and contact information that is linked to from Onvio Trial Balance.
- Select one of the following Sources to insert into the worksheet.
Note: Detail selections will vary in the Text Variables tab based on the selected Source.
- Workpaper Properties (for the Excel file that is currently open)
- Reference
- Name
- Staff Assignment
- Signoffs (Preparer and Reviewer)
- Contact name (the contact for which the Excel file is currently open)
- Binder Properties
- Binder Name
- Binder Type
- Binder Period Ending date
- Workpaper Properties (for the Excel file that is currently open)
- Click the Insert button to insert the variable into the selected cells of the worksheet.
Formulas
Use the Formulas tab to create and apply variable formulas for selected amount variable rows by using the add (+), subtract (-), multiply (*), and divide (\) operators.
- Click the Formulas tab in in the Insert Variables panel.
- Click Add Row to insert a row in the Formulas grid.
- In the first row of the grid, select an amount type, amount detail (i.e., account or code, if applicable), and balance type.
Note: These parameters are specific to each row.
- Select an operator to apply to the next row.
- Repeat step 2-4 for the next row and for subsequent rows, if necessary.
- In the fields below the Formulas grid, select the period and fiscal year for the current contact.
- Click the Insert button to add the result of the calculation into the selected cell.
Notes
- The application prompts you to specify a value for Amount Detail if it is not included when you attempt to insert a row—unless Net Income is selected as the Amount Type value.
- The application inserts an Add (+) operator by default if it is not selected when an Amount Type value is selected.
- You don't need to include an operator after the last row that has an Amount Type selected.
- Amount formulas can be easily copied from a range of cells, into another range of cells.
Internal notes
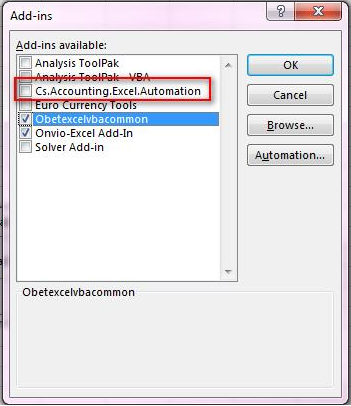
- If the add-in doesn't appear in Excel after installing, disable the Onvio Office Excel add-in. In Excel, choose File > Options > Add-ins. In the Manage field, be sure the Excel Add-ins is selected, and click Go. Clear the checkbox for CS.Accounting.Excel.Automation.
- Choose File > Options > Add-ins. In the Manage field, be sure COM Add-ins is selected and click Go. Clear the checkbox for CS.Accounting.OfficeIntegration.ExcelVstoAddin.

- Close any open Excel spreadsheets.
- Sync and Close all open items in Onvio Link.
- Open an Excel spreadsheet from within the Binder tab, and verify that the Onvio Office Add-in ribbon is present in Excel. (If the ribbon is present, you should be able to re-enable the CS.Accounting add-in without causing an issue.)
Notes
- The user may have to repeat these steps again after updating or reinstalling the add-in.
- Copy and Paste in Excel stops working after inserting a variable until you double-click a blank cell—which makes the cursor visible in the cell. Development is currently looking into this issue.
Contact us
Call 800-968-0600