
Microsoft Excel and Word Onvio add-ins
 Show expandable text
 Hide expandable text
The Onvio add-in ribbon in Microsoft Excel and Microsoft Word enable you to create dynamic workpapers and documents in which your contacts' data is linked in real time from Onvio.
Download and install the add-ins
Before you download and install the Microsoft Excel and Microsoft Word Onvio add-ins, verify and perform the following actions, if necessary.
- Uninstall any separate installations of the Microsoft Excel and/or Microsoft Word add-ins that were previously installed.
- Verify which version of Office for Windows that you have installed (32-bit or 64-bit). (Note that it is possible that you can run the 32-bit or the 64-bit version of Office on a 64-bit machine.)
Choose one of the following links to download the appropriate zip file for the Microsoft Excel and Word Onvio Add-in, open the zip file, and then double-click the .MSI to start the installation.
| All-in-one installation file for the Microsoft Excel and Word Onvio add-in ribbons |
|---|
| Onvio add-ins (32-bit) |
| Onvio add-ins (64-bit) |
Note: Onvio Link must be installed on your computer to download linked Microsoft Excel and Word documents and to use the Onvio ribbon.
Explore the Onvio add-in ribbon in Excel
Open a Microsoft Excel workpaper that you've downloaded from the Binders tab in Onvio Trial Balance via Onvio Link.
You can perform the following actions from the Onvio ribbon in Microsoft Excel.
- Select and insert linked account data from the current contact in Onvio Trial Balance via the Insert Variable panel.
- Insert the signoff initials of the Onvio staff member that currently has the workpaper opened.
- Insert a checkmark into selected cells.
- Update column data copied from another column via the Insert Variable panel.
Explore the Onvio add-in ribbon in Word
Open a Microsoft Word document that you've downloaded from the Documents area, or the Binders tab in Onvio Trial Balance via Onvio Link.
You can perform the following actions from the Onvio ribbon in Microsoft Word.
- Insert text variables from the Variable panel.
- Recalculate/refresh linked fields in the document.
- Toggle field codes on/off in the document to easily update variable data in the document.
Internal notes
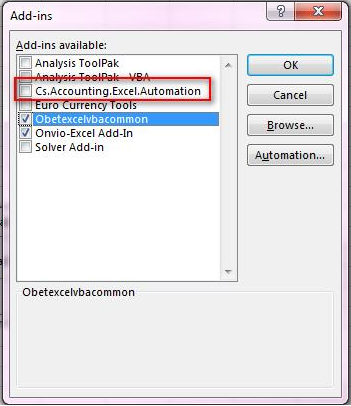
- If the add-in doesn't appear in Excel after installing, disable the Onvio Office Workpapers Excel add-in. In Excel, choose File > Options > Add-ins. In the Manage field, be sure the Excel Add-ins is selected, and click Go. Clear the checkbox for CS.Accounting.Excel.Automation.
- Choose File > Options > Add-ins. In the Manage field, be sure COM Add-ins is selected and click Go. Clear the checkbox for CS.Accounting.OfficeIntegration.ExcelVstoAddin.

- Close any open Excel spreadsheets.
- Sync and Close all open items in Onvio Link.
- Open an Excel spreadsheet from within the Binder tab, and verify that the Onvio Office Add-in ribbon is present in Excel. (If the ribbon is present, you should be able to re-enable the CS.Accounting add-in without causing an issue.)
Note: The user may have to repeat these steps again after updating or reinstalling the add-in.
Contact us
Call 800-968-0600